Problem : The test connection
operation failed for data source sample on server server1 at node XXXXXXXXX with the following exception: java.sql.SQLException:
[jcc][t4][10205][11234][3.57.82] Null userid is not supported. ERRORCODE=-4461,
SQLSTATE=42815 DSRA0010E: SQL State = 42815, Error Code = -4,461.View JVM logsfor further details.
Above exception we will get some time to test the connection in IBM DB 2 Data Source in WebSphere Application Server......
Solution:
Just restart server and check the test connection.....
(or)
Just provide (or) check user id in J2C authentication in global security.....
Error:
Administrator privileges are required. Message ID: CRIMC1018E. If u got error like below image just follow the steps to open IBM Installation Manager(IIM).
Solution:
It is mainly privileges problem. so follow the steps to resolve it......
1)Right click the IIM.
2)Select Run as administrator.
3)Click on Continue...
Normally we
see "page is under Maintenance" when we browse for some websites.
ex:
Sometimes websites
will go to update, modify ...etc. At the time user receives an error. But by
using this scenario we can server one page to user while we r doing website
modification.
Browser--->Web
Server(plug-in)---->Application Server (flow of request).
In above steps we will create one page in WebServer. We will configure
this page to redirect every request when we are under Maintenance.
I hope u got my point. Now we
will do it.
1)First install WebSphere Application
Server, IBM HTTP Server, Plug-in, WCT on your box.
2)Create one deployment manager profile
and one custom profile.
3)Federate the node to dmgr. Create one
server.
4)Configure WAS, IHS, Plug-in.
5)Deploy any one application.
6)Check this application is available
through WebServer.
ex:
http://localhost:80/home.(here
home is my application)
Everything is fine up to now. Think
now my "home" application is under maintenance stage. So I would like
to do it now.
7)First go to directory.
Then Go to "htdocs" folder in it.
8)Create one HTML Page in it like below
lines. Save it as "maintenance.html".
9)Create one empty text file and save it
as "serverdown.txt".
10)Then add below lines in httpd.conf
file(this file path is /conf/httpd.conf).
LoadModule rewrite_module
modules/mod_rewrite.so
RewriteEngine on
ReWriteCond %{DOCUMENT_ROOT}/serverdown.txt
-f
RewriteRule ^(.*)$ /maintenance.html [PT]
LoadModule rewrite_module modules/mod_rewrite.so
RewriteEngine on
RewriteCond %{DOCUMENT_ROOT}/serverdown.txt -f
RewriteRule ^(.*)$ /maintenance.html [PT]
11)Then restart IBM HTTP Server.
12)Then open browser. check your maintenance
page is served by IBM HTTP Server or not...
ex:
http://localhost:80/home .
Here we request for
page which is deployed in WebSphere Application Server. But we get maintenance
page.
After completing
modification in application, delete
serverdown.txt file. Then application is available for all users.
Subscribe My blog and send e-mail id for getting my articles in PDFs.....
Subscribe My You Tube channel to get alerts to your email....
Actually I started reading about web server and application server. I
got one doubt about it. How the static content page serve the IBM HTTP Server.
Once we know the what is the static content page then we can understand about
dynamic content page.
Generally Static content page is a web page which is slandered for every user. It won't change based on
user. But dynamic content page will be changed based on user.
Normally HTML page is static content page . JAVA,.NET,PHP pages are
dynamic content pages.
Now we can practice how a HTML Page serve to user through HTTP Request
and Response from IBM HTTP Server(Web Server).
So, Let us do it now.....
1)Install IBM HTTP Server on my box. Then
Start IBM HTTP Server.
Click below link for installation process of IBM HTTP Server
1.First create one deployment profile
(dmgr), one Custom profile (node).
2.Federate node to dmgr.
3.Open Admin Console in browser.
ex:
http://:/ibm/console
4.I divided this task into 3 parts (Generally
to configure data source we will follow like this only).
1)Creating
an authentication alias.
2)Creating
the JDBC provider.
3)Creating
data source.
5)Let us do it now..........
Task 1) Creating an authentication alias:
Normally an authentication alias
is required to access database. An authentication alias contains user ID and
Password.
Now follow the step to
complete this step.
1)Login to admin console, Expand
Security------->Click on "Global Security"
2)In authentication page, Expand
"Java Authentication and Authorization Service"-------->Click on
"J2C authentication data".
3)Click on "New".
4)Provide the values for Alias, User ID
and Password. Here User Id and Password must have to access the database.
ex:
Alias ----------- Sample_login
User
ID ----------- sample (It is my database User ID)
Password ----------- xxxxxxxx(It
is my database password)
Note: Here User ID and Password change
according to your database.
5)Click on "Apply". Then Click
on "review" and select the check box "Synchronize changes with
Nodes" and click on "Save". Click on "Ok".
6)Now
u can check an authentication alias is created. It is like below image.
7)We completed first task......Now we will
move to next task.....
Task 2)Creating the JDBC provider:
Follow the steps to
complete this task.......
1)Expand "Resources" in the
admin console.
2)Expand "JDBC". Click on "JDBC
Provides". Then Select the Scope( I selected node scope).
3)Click on "New".
4)Provide the Database type, Provider
Type, Implementation type and Name. Then click on "Next"
Ex:
Database
type -------- oracle
Provider
type -------- oracle JDBC Driver
Implementation
type -------- Connection pool data source
Name -------- oracle JDBC Driver (It is
default name. If u want to change u will modify it)
5)Provide the path for jar files.(Where it
is saved in your box).Then click on "Next".
6)Verify summary. Click on
"Finish". Then Click on "review" and select the check box
"Synchronize changes with Nodes" and click on "Save". Click
on "Ok".
7)Now u can check JDBC driver is created.
8) We completed Second task......Now we
will move to last task.....
Task 3)Creating data source:
Follow the steps to
complete this task......
1)Expand "Resources" in the
admin console.
2)Expand "JDBC". Click on
"Data sources". Then Select the Scope( I selected node scope).
3)Click on "New".
4)Provide Data source name and JNDI name.
Then click on "Next".
ex:
Data
source name -------- sample
JNDI
name -------- jndi/sample
5)Select "select an existing JDBC
provide" radio button. Then select "oracle JDBC driver" in drop
down list. Then click on "Next".
6)Specify the URL.
ex:
jdbc:oracle:thin:@localhost:1521:XE
7)Select "Component-managed
authentication alias", "Mapping-configuration alias " and
"Container-managed authentication alias" from drop down list. Then
click on "Next".
ex:
Component-managed
authentication alias ---- Sample_login
Container-managed
authentication alias ---- Sample_login
Here Sample_login is name of an
authentication alias.
8)Verify summary. Click on
"Finish". Then Click on "review" and select the check box
"Synchronize changes with Nodes" and click on "Save". Click
on "Ok".
9)Now u can check Data source is created.
8) We completed all tasks......Now we will
check test connection.....
9)Select "sample"(My data source
name) and click on "Test
connection".
10)Verify test connection is successful or
not. If it is successful u will get message like below image.
Subscribe My blog and send e-mail id for getting my articles in PDFs.....
Subscribe My You Tube channel to get alerts to your email....
1.First create one deployment profile
(dmgr), one Custom profile (node).
2.Federate node to dmgr.
3.Open Admin Console in browser.
ex:
http://:/ibm/console
4.I divided this task into 3 parts
(Generally to configure data source we will follow like this only).
1)Creating
an authentication alias.
2)Creating
the JDBC provider.
3)Creating
data source.
5)Let us do it now..........
Task 1) Creating an authentication alias:
Normally an
authentication alias is required to access database. An authentication alias
contains user ID and Password.
Now follow the step to
complete this step.
1)Login to admin console, Expand
Security------->Click on "Global Security".
2)In authentication page, Expand
"Java Authentication and Authorization Service"-------->Click on
"J2C authentication data".
3)Click on "New".
4)Provide the values for Alias, User ID
and Password. Here User Id and Password must have to access the database.
ex:
Alias ----------- Sample_login
User
ID ----------- sudhu (It is my database User ID)
Password ----------- xxxxxxxx(It
is my database password)
Note: Here User ID and Password change
according to your database.
5)Click on "Apply". Then Click
on "review" and select the check box "Synchronize changes with
Nodes" and click on "Save". Click on "OK".
6)Now
u can check an authentication alias is created. It is like below image.
7)We completed first task......Now we will
move to next task.....
Task 2)Creating the JDBC provider:
Follow the steps to
complete this task.......
1)Expand "Resources" in the
admin console.
2)Expand "JDBC". Click on "JDBC
Provides".Then Select the Scope( I selected node scope).
3)Click on "New".
4)Provide the Database type, Provider
Type, Implementation type and Name. Then click on "Next"
Ex:
Database
type -------- DB2
Provider
type -------- DB2 Universal JDBC Driver Provider
Implementation
type -------- Connection pool data source
Name -------- DB2 Universal JDBC Driver
Provider (It is default name. If u want to change u will modify it)
5)Provide the path for jar files.(Where it
is saved in your box).Then click on "Next".
6)Verify summary. Click on
"Finish". Then Click on "review" and select the check box
"Synchronize changes with Nodes" and click on "Save". Click
on "Ok".
7)Now u can check JDBC driver is created.
8) We completed Second task......Now we
will move to last task.....
Task 3)Creating data source:
Follow the steps to
complete this task......
1) 1)Expand "Resources" in the
admin console.
2)Expand "JDBC". Click on
"Data sources". Then select the Scope( I selected node scope).
3)Click on "New".
4)Provide Data source name and JNDI name.
Then click on "Next".
ex:
Data
source name -------- sample
JNDI
name -------- jndi/sample
5)Select "select an existing JDBC
provide" radio button. Then select DB2 JDBC provider in drop down list.
Then click on "Next".
6)Specify the values of Driver type,
Database name, Server name and Port number. Then click on "Next".
ex:
Driver
type -------- 4
Database
name -------- sample (it is based on your
database name. I am using default database in DB2. So, change according to your
environment database)
Server
name -------- localhost(Specify the server
name where DB2 is installed. I am installed DB2 in my local system. So, I used
localhost)
Port
number -------- 50000 (Based on DB2 port no.)
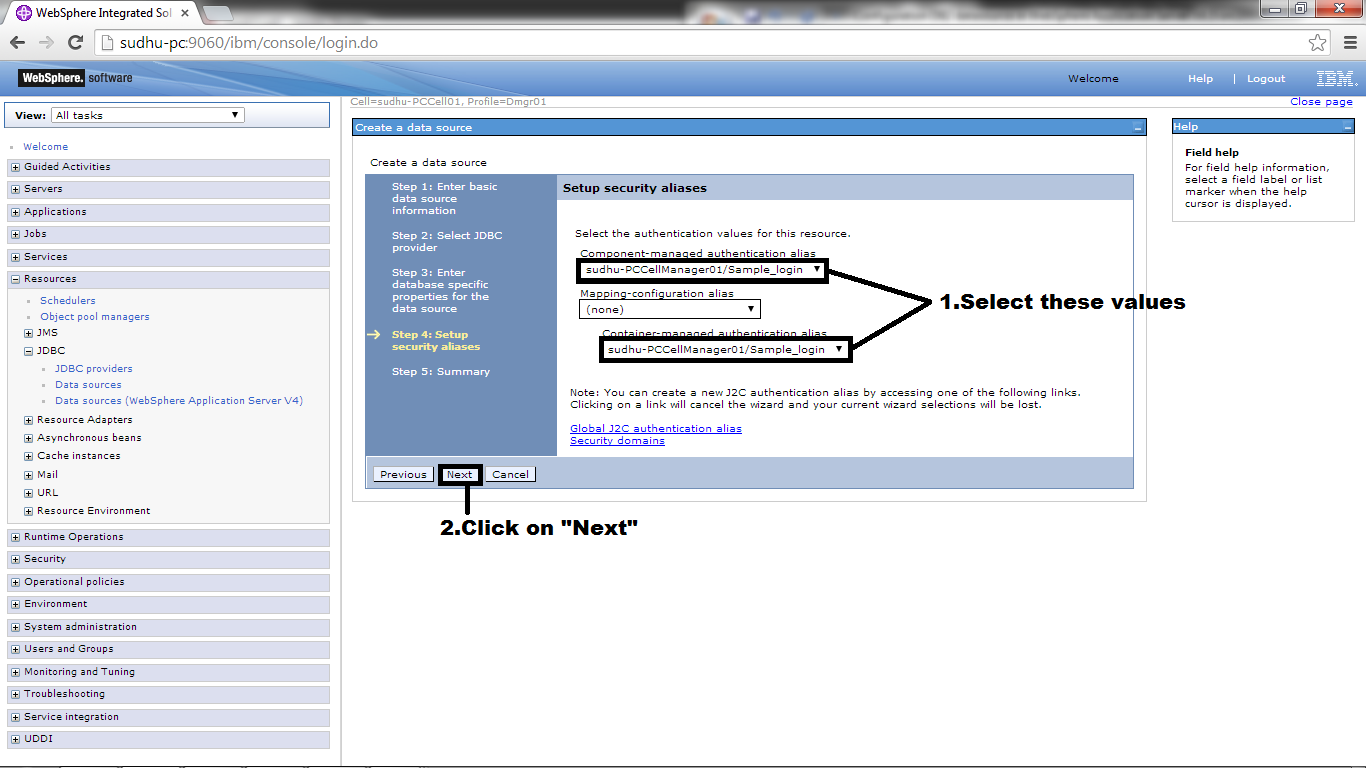
7)Select "Component-managed
authentication alias", "Mapping-configuration alias " and
"Container-managed authentication alias" from dropdown list. Then
click on "Next".
ex:
Component-managed
authentication alias ---- Sample_login
Container-managed
authentication alias ---- Sample_login
Here Sample_login is name of an
authentication alias.
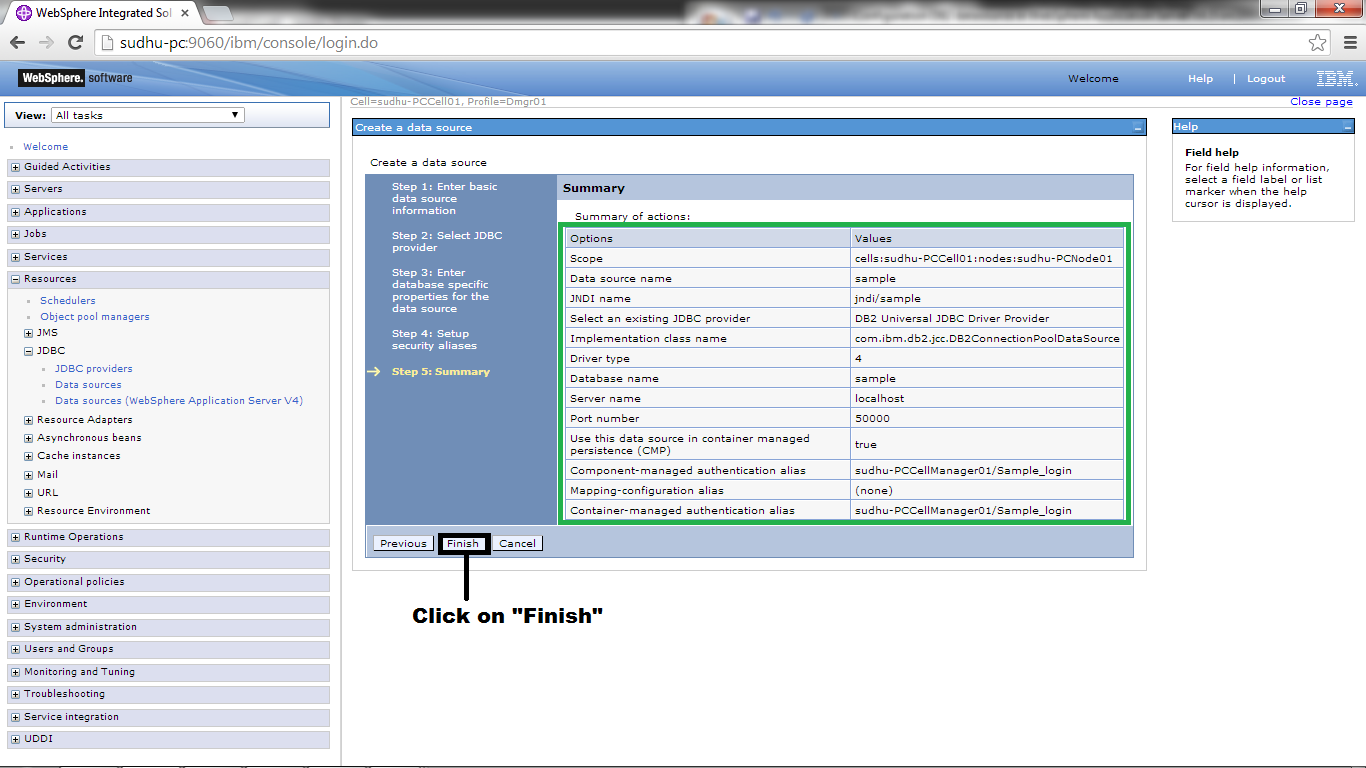
8)Verify summary. Click on
"Finish". Then Click on "review" and select the check box
"Synchronize changes with Nodes" and click on "Save". Click
on "Ok".
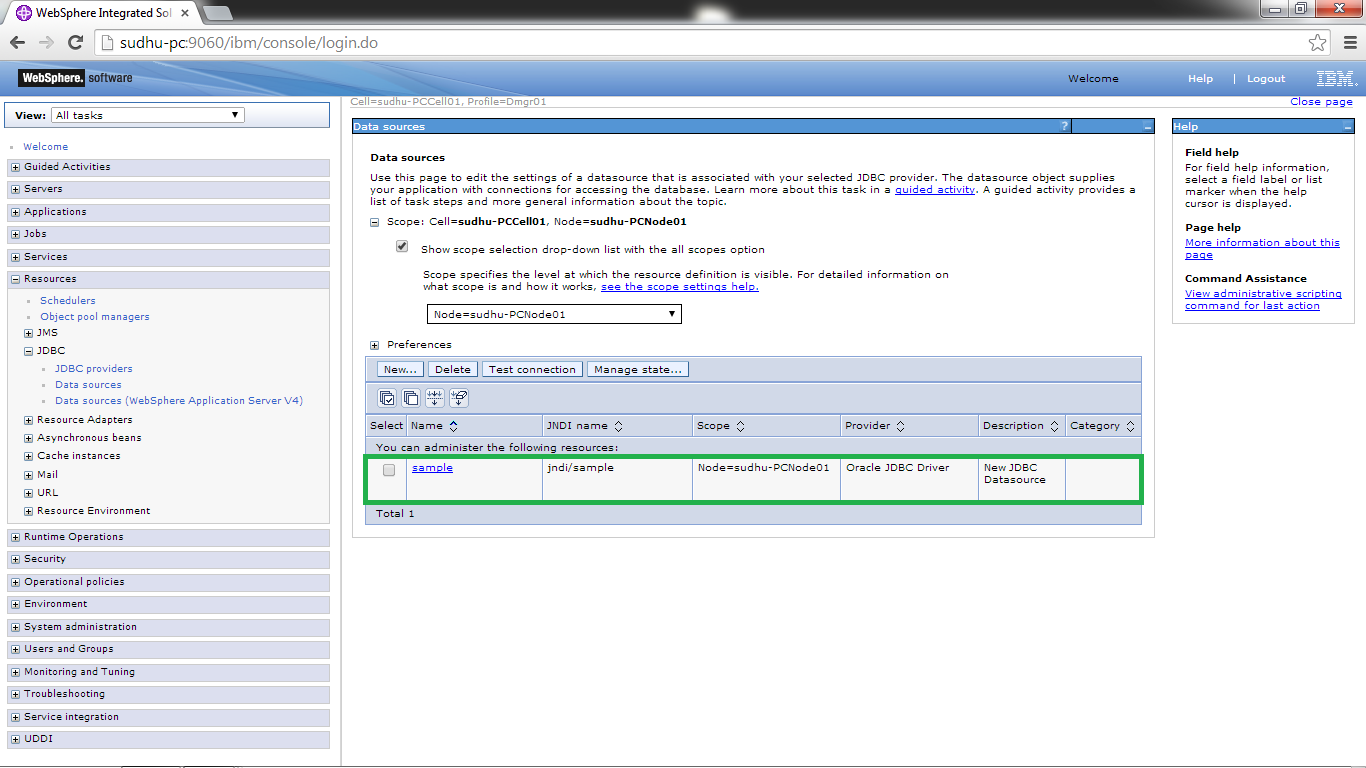
9)Now u can check Data source is created.
8) We completed all tasks......Now we will
check test connection.....
9)Select "sample"(My data source
name) and click on "Test
connection".
10)Verify test connection is successful or
not. If it is successful u will get message like below image.
Subscribe My blog and send e-mail id for getting my articles in PDFs.....
Subscribe My You Tube channel to get alerts to your email....